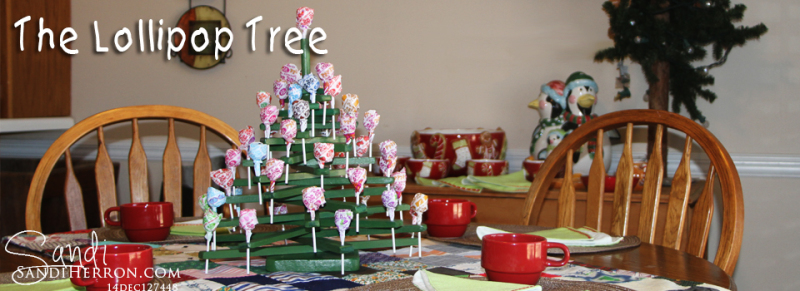
The Lollipop Tree
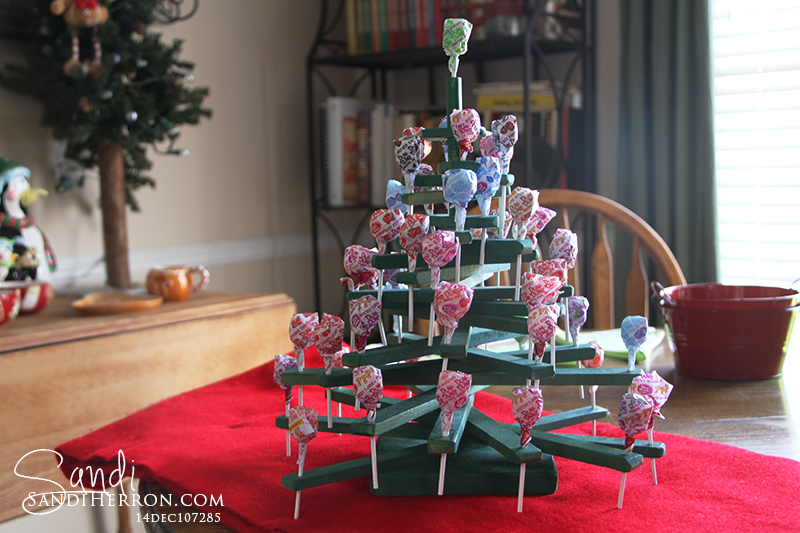
Finished stacking and inserting the lollipops!
Years ago my husband traveled with his job, and with him away, there were times I could not sleep at night. I learned a lot of new skills during those times, one of them being woodworking. My husband will tell you that it was his worst nightmare when he was all the way across the country and received a call late one night, with me asking, “How do I turn on this saw in your workshop?” Silence on the phone while he tried to gather his thoughts before responding, “Which saw?” Of course, it was the big radial arm saw. Looking back, I will tell anyone with no experience with electrical saws, especially a radial arm saw, don’t do this late at night and without some supervision at least on your first couple of attempts at using it. I made it fine, but I can only imagine what I put my husband through with all my late-night endeavors in his workshop. And there is also a story I will share with you later about a circular saw. Who knew that a saw with a name like “circular saw” would not be the perfect tool for cutting circles. I didn’t.
During the time of learning woodwork, one of the things I created was a Lollipop Tree which has become a family tradition at Christmastime with my kids and now my grands. Below I am sharing pictures and a few details on how I made what I consider one of the most simple projects during my early days of woodworking. It is a delight for guests to find the Lollipop Tree sitting on a table filled with lollipops, Tootsie roll pops, or any type of candy that comes on a stick. Be creative! And please share your project pictures with us when you are finished making your own!

Lollipop tree supplies
WHAT YOU WILL NEED
3/4-inch x 1/2-inch strips of wood. Check with your local home building supply store in the trim department. You can use scrap wood for this as I did, but make sure that you have strips long enough for the pieces you will need to cut according to the measurements needed. You will need 24 pieces at various lengths. Cut 4 strips at the following lengths (inches): 14, 12, 10, 8, 6, and 4 inches. (Example: You will need 4 of the 14-inch length strips, etc.) You will also need one 2-inch piece for the top. (Note: I used sandpaper to slightly round the ends of each strip, but this is not needed. Keep it simple!)
Dowel rod, 1/2 inch diameter, cut to a length of 13-inches
One 6x6x1-inch piece of wood to use as the base with a 9/16-inch hole drilled in the center
Drill with 9/16″ and 3/16″ drill bits
Acrylic paint, satin varnish finish, brushes, and light grit sandpaper
DIRECTIONS
After all pieces are cut, paint each piece with acrylic paint. I used a Christmas Green color for my tree. Let the paint dry, then lightly sand, then apply a second coat of paint. Let dry, then rub with a paper towel to remove any grit. Brush on satin varnish and let dry completely.
When completely dry, measure to find the middle of each piece of your cut strips. Mark your measurement and then drill a 9/16-inch hole. This is for sliding your strips on the dowel rod as you form your tree.
On each end of the strip, drill a small hole for the candy stick to fit through.
Place your 6-inch-square base on the table. (Note: In order to protect my table from scratches, I glued a piece of heavy felt to the bottom of the base after the hole was drilled.)
Place the dowel rod in the hole you drilled in the middle of the base. Begin sliding your cut pieces onto the dowel rod, beginning with the 14-inch lengths and ending with the 2-inch piece at the top. Begin inserting lollipops in the holes you drilled on the end of each strip, adjusting the placement of the strips as needed.
Here are pictures to help guide you through the process of making and displaying your tree!


Our family has enjoyed our Lollipop Tree for years. This was one of my first designs. It is free for you to use, but we ask that when you share, please link back to our site for instructions. Please leave us any questions or comments. Enjoy the project!
Discover more from Sandi Herron - Life at Spring Meadows
Subscribe to get the latest posts sent to your email.